
Customising the Grid
All grids (see Data Selection Grids) come with a defined ‘Default View’. In most screens you are able to change this ‘Default View’ to suit your personal preference.
As an example, you may want to change the Default View of Payment Pay Items to remove the GL Credit Code:
- From the Navigator, choose Payroll | Payroll Framework | Pay Items | Payment Pay Items.
- Click the Choose Fields button in the toolbar:
 . The Customization window will appear – this may contain a list of fields from which you can select fields to be added to the grid.
 - Remove GL Credit Code: click on the column’s header field and, holding the left mouse button down, drag it down below the headings or back into the Customization window (your cursor will display a large black X to indicate you are removing the field).
- Release the mouse button and the GL Credit Code column will no longer be displayed in the grid.
Note: to add a new column to the grid, simply reverse the process.
- Locate the required entry in the Customization window, click on it and, holding the left mouse button down, drag it to the appropriate position within the existing column headers.
- Close the Customization window.
- Click your right-mouse button anywhere within the grid and from the pop-up menu, choose Save Settings. This will now become the Default View for this screen for this user login.
Enhanced Data Selection grids have the ability to ‘Group” data at various levels. For example, to group the Payment Pay Items data by Unit Measure:
- Click Options:
 and then select Group Panel.
The grey Group Panel will open at the top of the grid showing "Drag a column header here to group by that column". - Select the field which you want to group the data by and drag it up into the Group Panel.
- In this instance, drag the Unit Measure field up into the Group Panel. The data will then display grouped by Unit Measure.
- You can expand and collapse all nodes by clicking the
 and
and  buttons respectively.
See also Grouping data.
You can customize the grid by right clicking in its header. When you do this a menu will pop up giving you several customization options. Some of these options are specific to the column you have clicked on, while others will affect the entire grid:
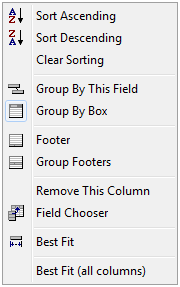
| Field | Explanation |
| Sort Ascending/Descending | This allows you sort by the chosen column either alphabetically or numerically depending on the content. |
| Clear Sorting | This returns the data to its original order. |
| Group By This Field | This will group the entire report by the chosen field. |
| Group By Box | This toggles the Group Header Panel on or off. |
| Footer | This toggles the footer panel on/off. This is typically used for grand totals. |
| Group Footers | This toggles the group footer panel on or off. This is typically used for group totals. |
| Remove This Column | This removes the column from the grid. |
You can total an individual column by right clicking on its footer. When you do this a menu will pop up giving you several options:
- For a Numerical Column: sum, min, max, count, average
- For a String Column: count.
See also Using Custom Grid Views